2. Biodesign
First lab work! we have two weeks to work with DNA plasmids, bacteria with the goal of identifying an antibiotic resistance gene. Let’s see how far we get.
Prelab Questions:
Restriction Digest
Download and review the genbank sequence files for pPSU1 and pPSU2.Use Benchling to upload these plasmid sequences.Use Benchling to simulate PstI and EcoRV restriction digests of the two plasmids. See this Benchling tutorial for instructions.- Where do PstI and EcoRV cut within their recognition sequences?
PstI:
CTGCA|G
G|ACGTC

EcoRV:
GAT|ATC
CTA|TAG
- What gene is encoded into the plasmids?
AmpR (Ampicilin resistance)
- How many copies of the plsamid would you roughly expect in each cell? What information did you use to determine this?
High copy number, in Add gene if you highlight the ORI it says high copy number
DNA Libraries
- How big is the E. Coli genome?
4.6M base pairs and 4K genes
-
The spectinomycin gene cassette of interest is 1.2 kb. What is the probability of finding that gene in a sheared E. coli gene fragment of 2,000 bases?
-
How many E. coli transformants would you have to screen through to have a 99% probability of finding the spectinomycin gene?
From the previous question, and we are looking for such that
Part 1: generate a ladder
Thursday 02/13
First, I followed QIAprep® Spin Miniprep Kit protocol, with a few changes as follows:
Note: the TAs already added LyseBlue and RNase A to Buffer P1, and ethanol to Buffer PE
- Pellet 1ml of pPSU1 and 1ml of pPSU2 by centrifugation at 8000 rpm (6800 x g) for 3 min at room temperature (15–25°C).
- Resuspend pelleted bacterial cells in 250 μl Buffer P1
and transfer to a microcentrifuge tube. - Add 250 μl Buffer P2 and mix thoroughly by inverting the tube 4–6 times until the solution becomes clear. Do not allow the lysis reaction to proceed for more than 5 min. If using LyseBlue reagent, the solution will turn blue.
- Add 350 μl Buffer N3 and mix immediately and thoroughly by inverting the tube 4–6 times. If using LyseBlue reagent, the solution will turn colorless.
- Centrifuge for 10 min at 13,000 rpm (~17,900 x g) in a table-top microcentrifuge.
- Apply the supernatant from step 5 to the QIAprep spin column by decanting or pipetting. Centrifuge at 3500 rpm for 30–60 s and discard the flow-through
Recommended: Wash the QIAprep spin column by adding 0.5 ml Buffer PB. Centrifuge for 30–60 s and discard the flow-through- Wash the QIAprep spin column by adding 0.75 ml Buffer PE. Centrifuge at 3500 rpm for 30–60 s and discard the flow-through
- Centrifuge for 1 min to remove residual wash buffer.
- Place the QIAprep column in a clean 1.5 ml microcentrifuge tube. To elute DNA,
add 50 μl Buffer EB (10 mM Tris·Cl, pH 8.5)
or waterto the center of the QIAprep spin column, let stand for 1 min, and centrifuge for 1 min.
Then, I placed the two tubes (labeled EY-P1 and EY-P2) in the fridge.
Friday 02/14
- Measure the concentration of your pPSU1 and pPSU2 DNA preps using the Nanodrop spectrophotometer.
- Clean stage with Kimwipe soaked with DI water.
- Wipe stage with dry Kimwipe.
- Add 2 uL DI
waterPE Buffer on stage and make blank measurement. - Wipe stage with dry Kimwipe.
- For each DNA sample, add 2 uL and measure and record the concentration (ng/uL). Wipe stage dry with Kimwipe between measurements.
- To finish, clean stage with Kimwipe soaked with DI water and then wipe dry.
Results:
| pPSU1 DNA | 50.2 ng/uL |
| pPSU2 DNA | 75.2 ng/uL |
- In separate digestion reactions with either the NEB enzymes PstI-HF or EcoRV-HF, cut both pPSU1 and pPSU2 DNA.
If plasmid yields are greater than 500 ng/uL in concentration, prepare a dilution of your plasmid with water to a concentration of 100 ng/uL and total volume greater than 10 uL. If a plasmid yield is less than 2 ug in total yield (concentration x volume), either repeat the prep or use as much as you have available for the two digestion reactions and uncut controls.- Prepare reaction with EcoRV-HF in a PCR tube PstI in (another) PCR tube (add anzymes last):
| To Reaction | Volume (50 uL Total) |
|---|---|
| 1 ug pPSU1 DNA | 19.9 uL |
| 1 ug pPSU2 DNA | 13.3 uL |
| DNase/RNase-Free Water | 9.8 uL |
| NEB Buffer CutSmart | 5 uL |
| NEB EcoRV-HF / NEB PstI-HF | 2 uL |
- Incubate reactions at 37C for 15 minutes in thermocycler. (the wait at 10C)
- Run the reactions alongside 100bp and 1kbp DNA ladder and uncut plasmid controls on a 1% agarose gel stained with SYBR-Safe at 120V for 1 hour. Scale down steps (i) and (ii) below by 1/3 if you are using the smaller gel box.
- Weigh 1.0 g agarose and add into 100 mL 1xTAE. Microwave until agarose completely dissolves. Be careful: The agarose is prone to boiling over and making a mess in the microwave.
- Add 10 uL of 10000xSYBR-Safe DNA stain. Use heat-resistant glove to gently swirl to mix (careful of burn hazard). Pour into rotated gel box tray (check beforehand that seal is watertight and do not fill past the bottom of the comb slots) and insert comb.
- Wait 45-60 minutes for gel to set.
- Remove comb and rotate tray so lanes are closest to cathode (black cable). Fill gel box with 1xTAE until gel is submerged.
- Load the following into separate lanes. I had some troubles loading one of my lanes (4) - it seems to be missing some loading dye. Adding loading dye made it better. Another problem I had - my pipette tip was tight against the bottom of the well, so pipetting build up pressure which then got released and the solution floated upwards
| To Lane | Pre-Mix |
| NEB 100 bp Ref Ladder | 2 uL 100 bp DNA Ladder (500 ng/ul) + 48 uL water + 10 uL 6xGel Loading Dye |
| NEB 1 kb Ref Ladder | 2 uL 1 kb DNA Ladder (500 ng/ul) + 48 uL water + 10 uL 6xGel Loading Dye |
| Uncut pPSU1 Neg Control | 19.9 uL for 1 ug pPSU1 DNA + 30.1 uL water + 10 uL 6xGel Loading Dye (I only had 11uL~ left in my pPSU1 tube) |
| Uncut pPSU2 Neg Control | 13.3 uL for 1 ug pPSU2 DNA + 36.7 uL water + 10 uL 6xGel Loading Dye |
| EcoRV-HF Digest Reaction | 50 uL of Digest Reaction + 10 uL 6xGel Loading Dye |
| PstI-HF Digest Reaction | 50 uL of Digest Reaction + 10 uL 6xGel Loading Dye |
- Insert gel box lid, connect cables to power supply, and run at 120V for 1 hour. Tommy and I put the gel together and went to have lunch, sadly tho, when we came back Alex found out the cable got disconnected and using the loading dye we saw it didn’t run for long enough time. Thus, we decided to pause the process, put the gel in wrap and in the fridge and continue at 5pm
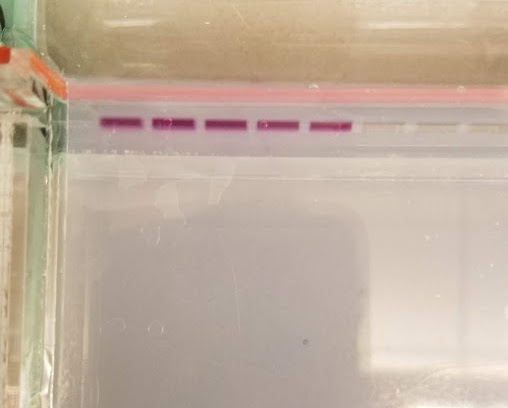
Update: went back at 5pm, ran the gel, and…
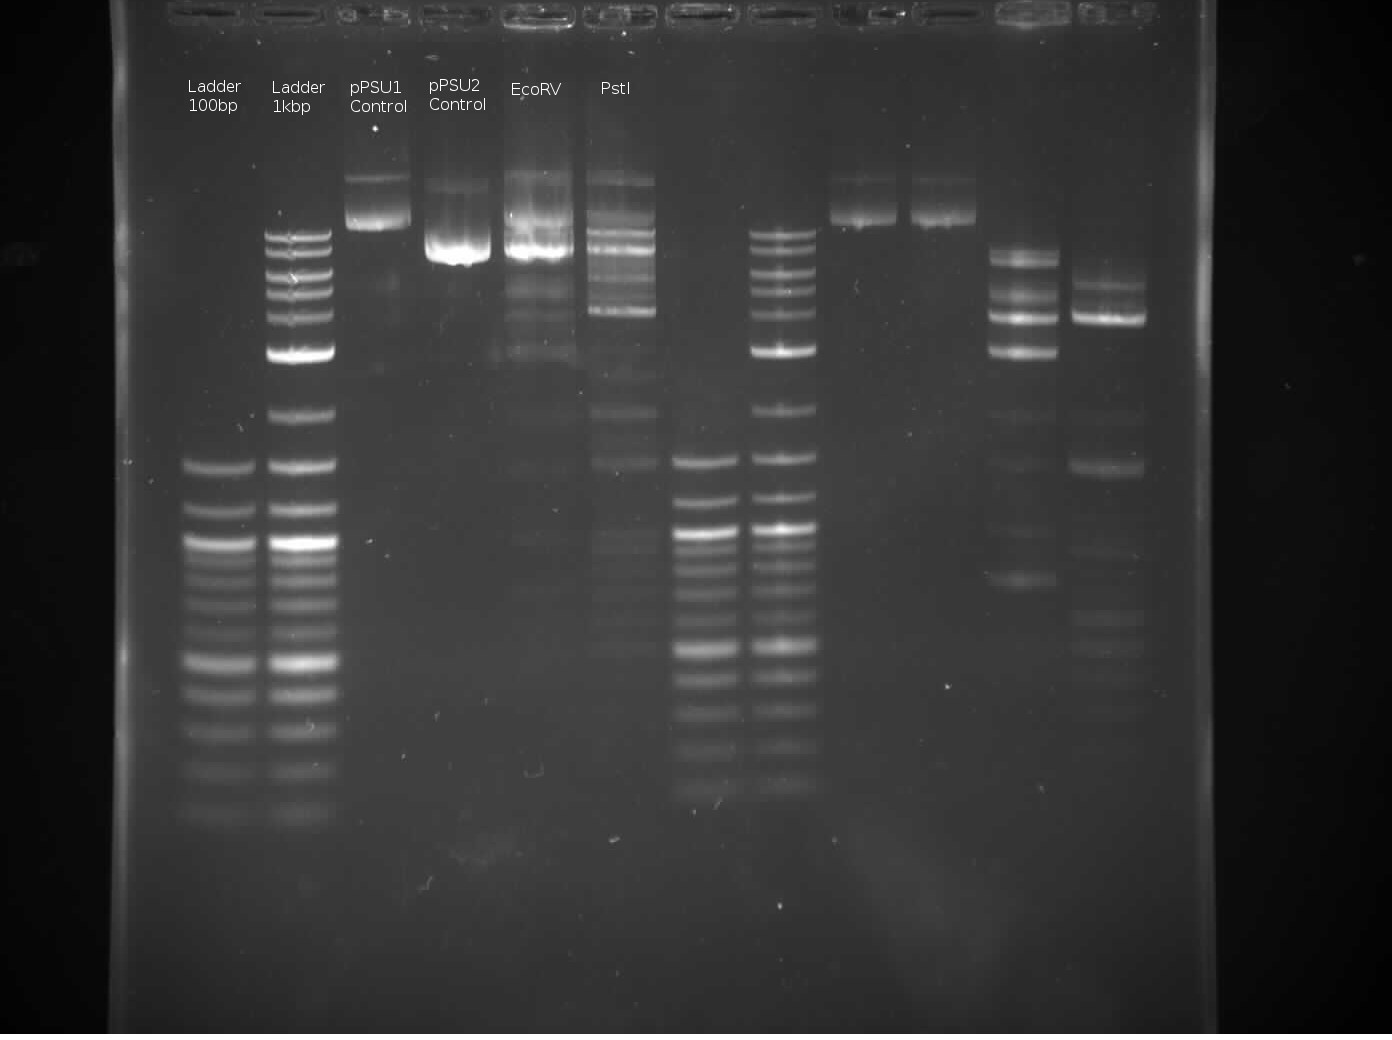
The above images was generated using 2 seconds exposure time. The left 6 lanes are mines, while the right 6 lanes are Tommy’s.
Regarding the control lanes, it makes sense that pPSU2 will move further down, close to the 1kb ladder second band, since pPSU2 is 7750 bp long and pPSU1 is 10kbp long.
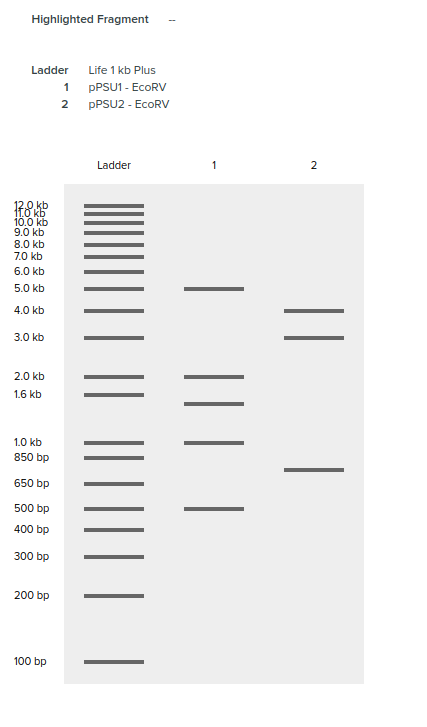
Regarding the EcoRV lane, it seems the enyzmatic response didn’t work quite as expected, especially comapring to Tommy’s lane an also Benchling’s virtaul digest:
Regarding the PstI lane, the restriction enzyme did seem to work but the bands are not as clear. I’m suspecting I did not have enough DNA substrate.
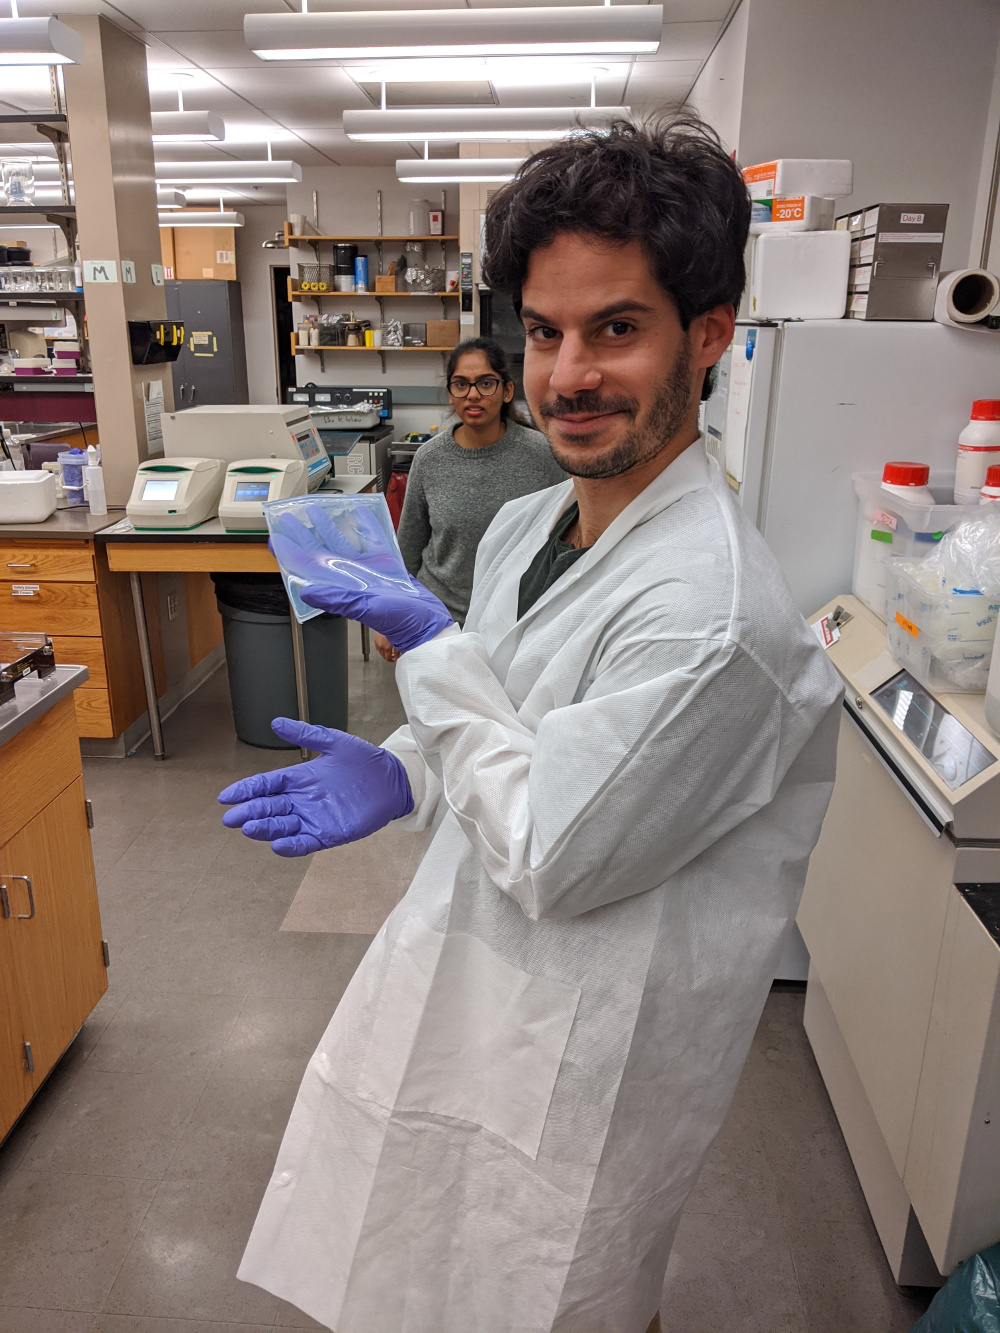
And a gel selfie:
-
For the banding from the EcoRV-HF digestion, explain the relative brightnesses of the 500 bp and the 5 kb bands. Didn’t get good results, but I’m not sure why there should be a relative difference between those bands?
-
For the banding from the PstI-HF digestion, explain the relative brightnesses of the 500 bp and the 600 bp bands. Didn’t get it, but I guess the answer should be that both plasmids are cut to generate 500bp piece, which will result in higher beightness, while only PstI on pPSU2 generates a 600bp fragment so it will be less intense.
Wednesday 02/19
gDNA Extraction with the DNEasy Kit
-
Harvest ~1.5 mL of culture into two 1.5 mL centrifuge tubes and pellet at ~5,000g (-> 9500rpm) for 5 min. Carefully remove and discard the supernatant.
-
Resuspend each pellet in 180 uL Buffer ATL.
-
Add 20 uL proteinase K. Incubate at 56C for 30 min.
-
Vortex for 15s.
-
Add 200 uL Buffer AL to each sample and mix by vortexing.
-
Add 200 uL absolute ethanol to each sample and mix by vortexing.
-
Pipet this mixture onto the Dneasy Mini Spin column in a 2 mL collection tube. Spin at 6,000g (-> 10300rpm) for 1 min and discard the flow-through and collection tube.
-
Place the spin column into a new 2 mL collection tube. Add 500 uL buffer AW1. (had to stop, put in the fridge, and came back after a 1 hour) Centrifuge for 1 min and discard the flow-through and the collection tube.
-
Place the spin column into a new 2 mL collection tube, add 500 uL buffer AW2 and centrifuge for 3 min. Discard the flow-through and the collection tube.
-
Transfer the spin column to a new 1.5 mL centrifuge tube (where you will store the DNA).
-
Elute the dNA by adding 200 uL buffer AE to the center of the spin column membrane. Incubate for 1 min at room temperature, then centrifuge for 1 min.
-
Quantitate the concentration of the DNA.
Results:
| DNA 1 | 32.3 ng/uL |
| DNA 2 | 48.3 ng/uL |
Friday 02/21
Shearing and Gel Electrophoresis Analysis of Genomic DNA
1) Analyze the concentration of the gDNA on the nanodrop and compute your total amount of DNA. To perform the four digests below you will need a total of 8 micrograms of DNA. If you don’t have this much, feel free to only perform a subset.
2) Set up a restriction restriction digest with 2 micrograms of the genomic DNA sample in Cutsmart buffer with EcoRI-HF, EcoRV-HF, and PvuII-HF. Use the recipes in part 1 to guide your triple digest reaction. Let the reaction go for 1 hour at 37C.
Mix Digest:
| DNA | 41.4uL |
| Buffer | 5uL |
| EcoRI-HF | 2uL |
| EcoRV-HF | 2uL |
| PvuII-HF | 2uL |
| Total | 52.4uL |
3) Set up three more restriction digest with the restriction enzyme Sau3AI. Because Sau3AI is a promiscuous restriction enzyme with a 4-base-pair recognition site, we will use various concentrations for these digestions as described below…
3a. Prepare 1x CutSmart buffer by diluting 1 part 10x Cutsmart into 9 parts water. You will probably need ~200 uL of 1x CutSmart for these dilutions. You can prepare these dilutions in a PCR strip tube.
3b. Prepare a 1:10 dilution of Sau3AI by diluting 1 part of the stock enzyme into 9 parts 1x CutSmart buffer from step 3a. (I actually used Belen’s dilutions since she had extras)
3c. Prepare a 1:100 dilution of Sau3AI by diluting 1 part of the 1:10 enzyme dilution again 1:10 as above. (I actually used Belen’s dilutions since she had extras)
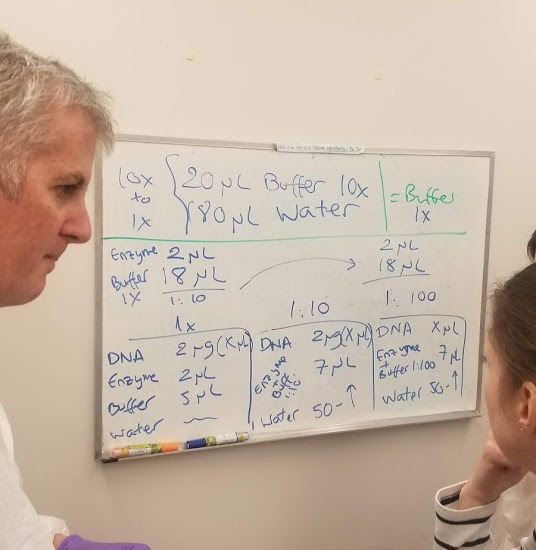
3d. Finally, set up 3 different digests with the different enzyme dilutions. In the first digest, use 1 uL of the stock Sau3A enzyme. In the second digest, use 1 uL of the 1:10 dilution of Sau3AI. In the third digest, use 1 uL of the 1:100 dilution of Sau3AI. The rest of the components (buffer, DNA) should be the same.
Note: In these digests, make sure that the 10X cutsmart buffer is 10% of the total volume of the reaction. For the triple digest, don’t increase the concentration of buffer, even though you are using more enzyme.
Sau3AI Digest:
| DNA | 41.4uL |
| Water | 2.6uL |
| Buffer | 5uL |
| Sau3AI 1:1 | 2uL |
| Total | 50uL |
| DNA | 41.4uL |
| Water | 2.6uL |
| Buffer | 5uL |
| Sau3AI 1:10 | 2uL |
| Total | 50uL |
| DNA | 41.4uL |
| Water | 2.6uL |
| Buffer | 5uL |
| Sau3AI 1:100 | 2uL |
| Total | 50uL |
4) Run half of each restriction digest on gels alongside a ladder to assess the efficiency of the reactions.
Check out my beautiful lanes:
Lane map:
| 1 | 2 | 3 | 4 | 5 |
| Ladder | Triple Enzyme Mix | Sau3AI 1:1 | Sau3AI 1:10 | Sau3AI 1:100 |
5) Perform a gel extraction of the fragments from ~1.5 kb – 3.5 or 4 kb using the Qiagen Gel Extraction kit supplied in lab. The protocol is printed out but reproduced below. Quantitate the concentration of the purified product on the nanodrop.
5a. Put your gel on the blue light transilluminator. Looking through the orange screen, slice out your desired molecular weight range, using the ladder (I used a 100bp ladder, although 1kb ladder would be better) as a guide.
On the transilluminator I could see the ladder clearly, but no smears on the lanes. So i went to the UV machine (1sec exposure) and ot the following:
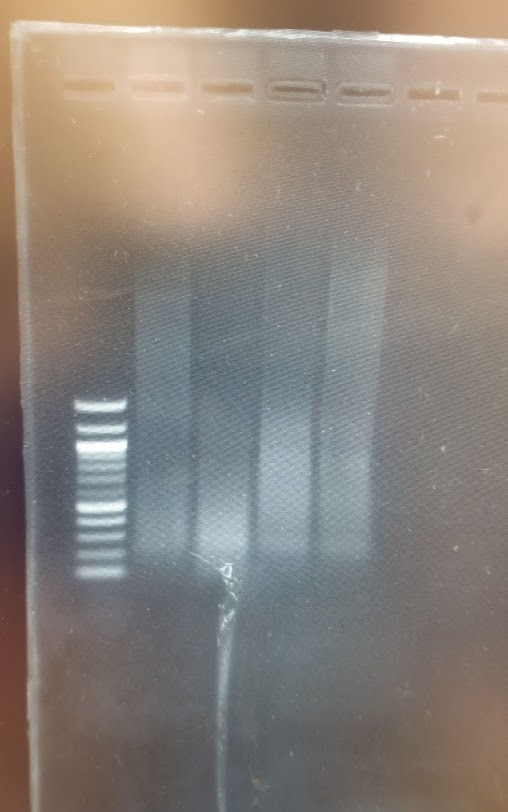
Cool. So we have smears and we have DNA… now back to the transilluminator, I used the ladders to cut off two pieces, vertically from the 1.5kb band until a bit above the 3kb, horiznatollay from the Mix lane and Sau3AI 1:10 lane (as that one seemed to have the most DNA for these bands)

5b. Estimate the volume of the gel slice (estimated as 300ml, although adding 900ml filled up the eppendorf tube, so it was probably 600ml) and add 3x the volume of buffer QG (gel dissolving buffer) to the tube. If you estimate that the gel slice is more than 400 microliters, cut it into two pieces and continue with two tubes. Incubate the gel slice in the 50ºC bath for ~10 minutes and vortex. If the gel is not dissolved, keep incubating and vortexing until it is. Don’t use more than 4 columns for your gel extraction, or we won’t have enough for everybody
5c. Place a QiaQuick spin column in a 2 mL collection tube and add the dissolved gel mixture. Centrifuge for 1 minute and discard the flow-through. If you have more than 800 microliters of sample, perform this step multilpe times to bind your sample. (had 1.5ml, so ran twice)
5d. Wash the column with 750 microliters of buffer PE and let the column stand for ~5 minutes. Then centrifuge for 1 minute.
5e. Discard the flow-through and spin the column again for 1 minute to remove excess wash buffer.
5f. Elute DNA by adding 30 microliters of buffer EB to the column, waiting for 1 minute, and spinning for a minute. Quantitate the yield on the nanodrop.
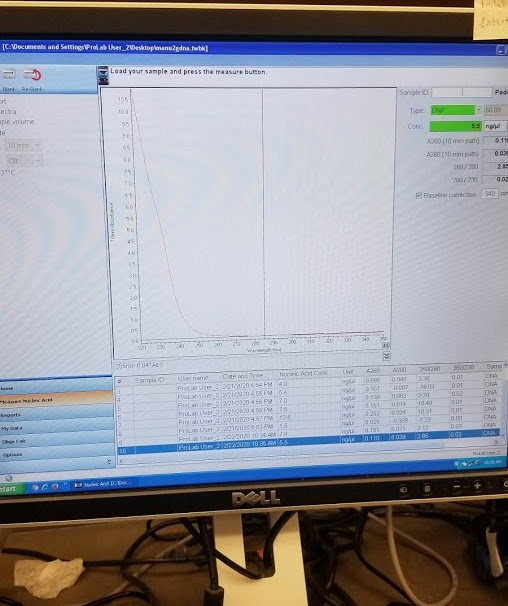
Saturday 02/22
Quantitate the yield on the nanodrop.
The first 2uL drop I quantified had 7.6 ng/uL but there was no “spectral peak” so I tried again, got 5.5 ng/uL but still nos pectral peak:
DNA Purification
Belen and I decided to add an extra step, and run the DNA Clean & Concentrator-25 kit, to get better yield of DNA. Protocol as follows:
Note: All centrifugation steps should be performed between 10,000 - 16,000 x g (We ran on 11000 rpm, perhaps too slow?)
1) In a 1.5 ml microcentrifuge tube, add 2 volumes of DNA Binding Buffer to each volume of DNA sample (for my case, I took 25uL of DNA and 50uL of Binding Buffer). Mix briefly by vortexing.
2) Transfer mixture to a provided Zymo-Spin™ Column in a Collection Tube
3) Centrifuge for 30 seconds. Discard the flow-through.
4) Add 200 µl DNA Wash Buffer to the column. Centrifuge at for 30 seconds. Repeat the wash step.
5) Add ≥ 25 µl DNA Elution Buffer or water directly to the column matrix and incubate at room temperature for one minute. Transfer the column to a 1.5 ml microcentrifuge tube and centrifuge at for 30 seconds to elute the DNA.
Ultra-pure DNA is now ready for use.
*Or is it? both Belen and I got concentration of <2 ng/uL after it… :(
The good new are that I got a nicer spectral peak.. so perhaps it is more pure?*
End Repair and Cloning of the Sheared Genomic DNA
Protocol for the Quick Blunting Kit (E1201)
1) Mix the following components in a sterile microfuge tube:
| Reagent | Volume |
| Purified DNA (up to 5 μg) | 19 μl |
| 10X Blunting Buffer | 2.5 μl |
| 1 mM dNTP Mix | 2.5 μl |
| Blunt Enzyme Mix | 1.0 μl |
| Total volume | 25 μl |
2) Reactions containing restriction enzyme digested DNA are incubated at room temperature for 15 minutes. Reactions with sheared/nebulized DNA or PCR products are incubated at room temperature for 30 minutes.
3) Immediately inactivate enzyme in the blunting reaction by heating at 70°C for 10 minutes.
Sadly, the Enzyme mix was outside freezing for 15~ minutes before I used it, so I hope this will work out.
Ligation Protocol for NEB PCR Cloning Kit
1) Assemble ligation reactions using the chart below as a guide. Mix the first 4 components before adding 5 μl of the cloning mix consisting of 4 μl Cloning Mix 1 and 1 μl Cloning Mix 2, for a total of 10 μl per ligation reaction. This ensures the ligase is not allowed to recircularize the vector backbone before this insert is present. It is recommended that first-time users of this kit perform the positive control ligation reaction.
| Reagent | Volume |
| Linearized pMiniT 2.0 Vector (25 ng/µl) | 1 μl (25 ng) |
| Purified or Unpurified, end-repaired genomic DNA | 1-4 μl |
| H20 | to 5 µL |
| Cloning Mix 1 | 4 uL |
| Cloning Mix 2 | 1 uL |
Sadly, there was barely any cloning mix left. It seemed like there’s 3-4uL in the tube, but I could not pipette it. So I mixed the first two reagents in a PCR tube, then movied the 5uL to the Cloning Mix 1 tube and mix it there. Then I moved 9 uL to the Cloning Mix 2 tube and mixed it there… qute inacurate but let’s hope
2) Incubate at room temperature (25°C) for 5–15 minutes. While 5 minutes is recommended, 15 minutes will increase transformation levels for inserts suspected as being difficult to clone.
3) Incubate on ice for 2 minutes.
I should have nanodropped it now.. but did not
4) Transform by electroporation into E. Coli.
Electroporation Protocol
Note: I did the whole electroporation thing twice. One the first time, I didn’t measure my DNA concentration and got sparks in all of my tubes. So on the second time I used 10% glycerol to add resistance to the sample.
1) Thaw cells + eppendorf tubes + cuvvetes + plasmids in ice for 15 minutes
All of these steps are done on ice!
2) Aliquot 25uL of cells in four eppendorfs
3) Add 1uL of plasmid DNA to each tube
4) If the DNA concentration is too high (nanodrop it!), add 75uL of glycerol 10%
5) Transfer 100ul of the mixture to the cuvette (no bubbles!)
6) Electroporate (press the two buttons until we hear a beep. Sparks are bad. Arcs are bad)
7) As fast as possible transfer 900ul of SOC to the cuvette and mix by pipetting up and down
8) Transfer 100uL to a new eppendorf
9) Incubate all tubes in 47C for 1 hour
Plating
-
Plated 200uL of the transformation to the big plates (with Carbenicillin and Spectinomycin)
-
Plated 50uL of the transformation to the small plates (with Carbenicillin)